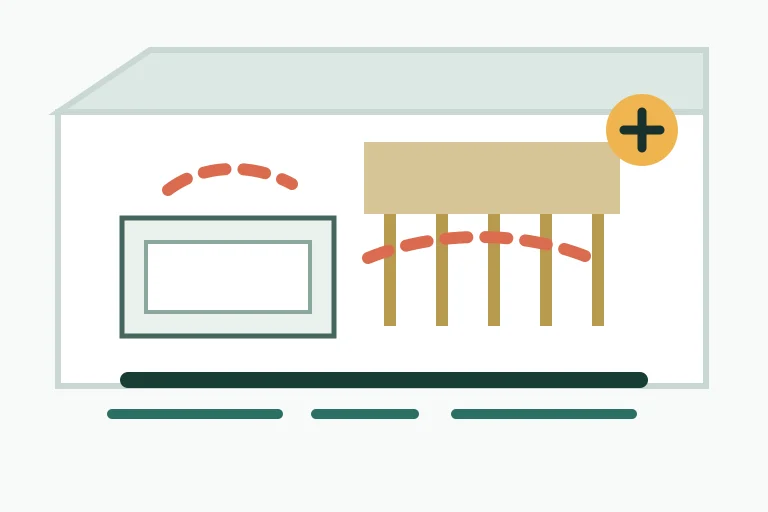
Insulation
air sealing rebate Ontario airtightness target 2026
Air sealing rebate Ontario airtightness target 2026: plan the audit, sealing work, retest, and HRS claim without missing rules.

If you are searching for air sealing rebate Ontario airtightness target 2026, the key point is simple: air sealing is not just a caulking job. Under the Home Renovation Savings assessment path, your home has to meet the airtightness target shown in the Renovation Upgrade Report after a follow-up assessment.
Plan it like a measured project. The rebate depends on the blower-door result, the timing of your energy assessments, and whether air sealing fits with at least one other qualifying upgrade.
| What you see | Likely cause | First move |
|---|---|---|
| Drafts at trim, outlets, or attic hatches | Small leaks connecting rooms to cold or unconditioned spaces | List the leak locations before the energy assessment |
| Cold upstairs rooms after attic work | Air leakage bypassing insulation | Seal top-floor penetrations before adding more insulation |
| Energy report shows a target ACH value | The advisor measured leakage with a blower door | Ask what result is needed for the $200 or $250 tier |
| Contractor quote says “basic caulking” only | Scope may not address hidden leakage paths | Request a room-by-room air-sealing scope |
| Rebate plan includes only air sealing | HRS assessment path normally requires two upgrades | Choose a second qualifying upgrade before work begins |
What You Need
Gather the basics before booking work. You need proof that you own the home, your heating fuel details, your utility account context, and a clear idea of which other upgrade you may bundle with air sealing.
- Recent utility bill or account details.
- Photos or notes showing drafty areas, attic hatches, basement penetrations, rim joists, and plumbing or wiring holes.
- Access to attic, basement, crawl space, mechanical room, and exterior doors for the energy advisor.
- A plan for at least two qualifying upgrades if you are using the assessment-required path.
- A folder for the initial report, contractor quotes, invoices, follow-up report, and rebate emails.
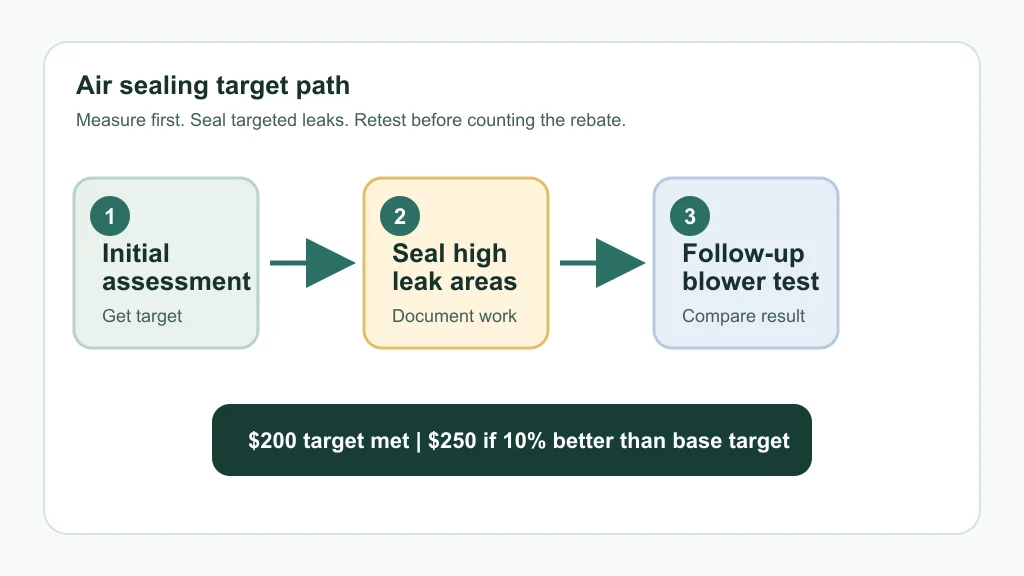
Step 1: Confirm the Assessment Path Before Work Starts
- Estimated time: 30 to 60 minutes. Start on the assessment-required Home Renovation Savings path, not a no-assessment insulation or heat pump stream. Air sealing is listed with upgrades that require an initial home energy assessment.
- Check the basic eligibility items: you own the home, the home type fits the program, and your heating setup fits the current Ontario rules. Detached, semi-detached, row or townhomes, and mobile homes on a permanent foundation are the common eligible types.
- Do not start sealing work first. Book the initial assessment so the advisor can measure leakage, produce the upgrade report, and give you the target that matters for the claim.
Here is where people get tripped up. Air sealing feels small enough to do on a weekend, but the rebate path is based on before-and-after measurement, so starting early can weaken your paperwork.
If you are comparing paths, use the Ontario Home Renovation Savings assessment vs no assessment 2026 comparison and the broader Home Renovation Savings Program Ontario 2026 guide before booking anything.
Step 2: Read the Airtightness Target on Your Upgrade Report
- Estimated time: 20 to 40 minutes after receiving the report. Find the air sealing line in the Renovation Upgrade Report and write down the target value exactly as shown.
- Ask the energy advisor to explain the difference between meeting the target and beating the base target by 10% or more. Under the current public HRS page, the target tier is listed at $200 and the stronger result is listed at $250.
- Use the report to decide whether air sealing should be your second upgrade or a later upgrade. HRS itself warns that results can vary, so choosing air sealing as a third upgrade or later may reduce the risk of missing eligibility.
That last point matters. A blower-door result can improve a little or a lot depending on how the house is built, where the leaks are, and whether the crew can reach the right areas.
Step 3: Build a Scope That Can Actually Change the Blower-Door Result
- Estimated time: 1 to 3 hours for scope review and quote comparison. Walk the house with the report in hand and separate visible comfort fixes from high-impact leakage points.
- Prioritize top and bottom leakage paths first: attic bypasses, plumbing stacks, wiring holes, pot lights, bath fans, attic hatches, rim joists, sill plates, and basement penetrations.
- Ask whether the contractor will use blower-door-guided sealing. It is not always required, but it can help the crew find leaks that a visual inspection misses.
- Confirm materials. Typical air sealing may involve caulk, gaskets, fire-rated sealant, foam, weatherstripping, rigid blocking, or attic hatch insulation, depending on the location and code requirements.
Cheap caulking around windows may make a room feel better, but it may not move the measured result enough. Focus on leaks that connect conditioned space to attics, basements, crawl spaces, garages, and outdoors.
Air sealing also pairs naturally with insulation. If attic leakage is part of the problem, review the attic insulation R-12 to R-50 2026 guide and the insulation rebate Ontario 2026 guide so the order of work makes sense.
Step 4: Choose the Second Upgrade Early
- Estimated time: 30 to 90 minutes. Pick the other qualifying upgrade before the contractor schedule fills up. Air sealing on the assessment path is meant to be bundled, not treated as a stand-alone rebate shortcut.
- Compare building-envelope upgrades first if your report points that way. Flat roofs, cathedral ceilings, windows, doors, basement insulation, and attic insulation can all change comfort and heat loss in different ways.
- Only add mechanical or electrical upgrades when they fit the house and budget. A heat pump, heat pump water heater, smart thermostat, EV charger, or solar storage decision should not be squeezed in just to make a rebate file look busier.
For adjacent envelope work, see the flat roof insulation rebate Ontario 2026 guide, the cathedral ceiling insulation rebate Ontario 2026 guide, and the window rebate Ontario 2026 guide.
For other upgrade planning, compare the heat pump water heater rebate Ontario 2026 guide, smart thermostat rebate Ontario 2026 guide, EV charger installation cost Canada 2026 guide, and solar battery storage rebate Ontario 2026 guide.
Step 5: Get Contractor and Advisor Responsibilities in Writing
- Estimated time: 30 to 60 minutes before signing. Confirm who schedules the initial and follow-up assessments, who performs the sealing, and who submits rebate documents.
- Ask for a scope that names the air-leakage zones, products, access assumptions, excluded areas, cleanup, and any safety limits around combustion appliances or attached garages.
- Keep the energy advisor separate from the contractor unless the program instructions allow the arrangement and you understand who is responsible for each step.
Use the Home Renovation Savings participating contractors Ontario 2026 guide when you are checking names, quotes, and documentation expectations.
If a heating upgrade is also in the plan, compare the heat pump cost Ontario 2026 rebate math guide, the Enbridge heat pump rebate Ontario 2026 guide, the Ontario heat pump rebate program 2026 guide, and the Ontario heat pump rebate with no energy assessment 2026 guide.
Step 6: Seal, Document, and Prepare for the Retest
- Estimated time: 1 day to several days, depending on access. Let the contractor complete the agreed sealing scope before insulation covers the work. Take photos of hidden areas before they are closed.
- Keep invoices detailed. They should show the home address, dates, work description, products, and contractor information.
- Before the follow-up assessment, make sure attic hatches, weatherstripping, exhaust penetrations, and basement sealing areas are finished. Half-done details can cost you the target.
- Schedule the final assessment with the same registered energy advisor or service organization path required by your file.
Do not rely on memory here. Save the report, quote, photos, invoices, and emails in one folder because the rebate claim depends on a clean paper trail as much as the air leakage result.
If financing is part of the budget conversation, read the Canada Greener Homes Loan 2026 update so you do not plan around a federal intake that is no longer open for new applications.
Step 7: Check the Result Before You Count the Rebate
- Estimated time: 15 to 30 minutes after the follow-up report arrives. Compare the final airtightness result against the target in the Renovation Upgrade Report.
- If the home meets the target, check whether the file lines up with the lower air-sealing tier. If it beats the base target by 10% or more, check whether the stronger tier applies.
- Wait for the advisor or service organization to submit the required documents before treating the rebate as guaranteed. HRS says rebate payment follows successful completion and document submission.
Good air sealing is still useful even if the final number misses the higher tier. It can reduce drafts, help insulation perform, and make future heating equipment sizing more predictable.
Common Mistakes That Put the Claim at Risk
- Starting air sealing before the initial assessment.
- Assuming caulking windows is the same as whole-home air sealing.
- Ignoring attic bypasses, rim joists, and service penetrations.
- Choosing air sealing as the only upgrade on an assessment-required path.
- Not asking what “10% or more above the base target” means for the actual home.
- Covering sealed areas before taking photos or saving product details.
Quick Checklist
- Confirm you are using the assessment-required Home Renovation Savings path.
- Book the initial assessment before any air sealing work starts.
- Write down the target value from the Renovation Upgrade Report.
- Choose at least one other qualifying upgrade early.
- Prioritize attic, basement, rim joist, hatch, and service-penetration leaks.
- Get scope, target, documentation duties, and retest timing in writing.
- Check the live official program page again before signing a quote.
Air sealing can be one of the most practical comfort upgrades in an older Ontario home, but the rebate version has to be measured. Start with the assessment, build the work around the target, and keep the paperwork tidy until the follow-up report is done.
Official source: Home Renovation Savings assessment-required upgrades page. Check the live page before applying because program rules and rebate amounts can change.
Frequently Asked Questions
what is the air sealing rebate in Ontario for 2026?
The current Home Renovation Savings assessment-required page lists air sealing at $200 when the home achieves the target in the Renovation Upgrade Report and $250 when it achieves 10% or more above the base target. The work has to fit the assessment path and the file must meet program rules.
what is an airtightness target for an Ontario rebate?
It is the air-leakage result your home needs to reach after upgrades, based on the energy advisor’s blower-door assessment and Renovation Upgrade Report. Use the number in your own report, not a generic online target.
can I get an air sealing rebate without an energy assessment in Ontario?
For the HRS air sealing rebate described here, start with an initial home energy assessment before work begins. Some other HRS upgrade streams do not require an assessment, but air sealing is listed on the assessment-required path.
does air sealing count as one of the two Home Renovation Savings upgrades?
Yes, air sealing can count as a qualifying upgrade on the assessment path when the result meets the target rules. Because results can vary, HRS recommends choosing it as a third upgrade or later if you want a safer route.
who measures the airtightness target for the rebate?
A registered energy advisor measures the home with a blower-door test during the initial and follow-up assessments. The final result is what tells you whether the home met the report target.
should I air seal before adding insulation?
Usually yes, especially in attics and other areas where insulation can hide leakage paths. Seal the bypasses first, document the work, and then let insulation do its job without warm indoor air leaking through it.